Agent - Price check and create Sales Quotation
Tuesday, March 10, 2026

Thursday, February 22, 2024
How to get a user group from a workflow work item
Below code snippet to get the user group for a workflow work item (if user group used for work item assignment)
WorkflowStepTable stepTable;
str userGroup;
select stepTable where stepTable.ElementId == WorkflowworkItemTable(buffer).ElementId;
userGroup = WorkflowConfigPersonPicker::newAssignmentTable(stepTable.workflowAssignmentTable()).parmParticipantTokenValue();
Wednesday, October 13, 2021
How To Get Dynamics 365 F&O URL through code - X++
var app = Microsoft.Dynamics.ApplicationPlatform.Environment.EnvironmentFactory::GetApplicationEnvironment();
Str envURL= app.Infrastructure.HostUrl;
#D365F&O #Dynamics #Finance #URL
How to cancel form control super method call
FormControlCancelableSuperEventArgs cancelSuperEventArgs = e as FormControlCancelableSuperEventArgs;
cancelSuperEventArgs.CancelSuperCall();
#D365FO #Dynamics #X++ #UI
Tuesday, February 23, 2021
How to get a list of tables (data sources) in an Entity through code - X++
public void tableList(TableName _tableName)
{
DictDataEntity dictEntity = new DictDataEntity(tableName2Id(_tableName));
int dataSourceCount;
Query query;
QueryBuildDataSource dataSourceName;
str entityTableName;
if (dictEntity)
{
query = dictEntity.query();
if (query.dataSourceCount() >= 1)
{
dataSourceCount = query.dataSourceCount();
}
for(int datasource=1;datasource<=dataSourceCount;datasource++)
{
dataSourceName = query.dataSourceNo(datasource);
entityTableName = tableId2Name(dataSourceName.table());
info(entityTableName );
}
}
}
#D365F&O #DataEntities #X++
Wednesday, June 3, 2020
How to List Down Data Entities with Data Management Enabled- D365F&O
class demoGetListofDataEntityObjects
{
/// <summary>
/// Runs the class with the specified arguments.
/// </summary>
/// <param name = "_args">The specified arguments.</param>
public static void main(Args _args)
{
demoGetListofDataEntityObjects entityObj =new demoGetListofDataEntityObjects();
entityObj.run();
}
public void run()
{
#define.EnLanguageId('en-us')
str tableName;
TableName tn;
demoDataEntityLabels elabels; - //Table Variable
delete_from elabels;
List entityList;
ListEnumerator enumerator;
DictDataEntity dataEntity;
DMFEntity dmfEntity;
DMFEntityName entityName;
entityList = DictDataEntity::listOfDataEntities();
enumerator = entityList.getEnumerator();
while(enumerator.moveNext())
{
dataEntity = new DictDataEntity(tablename2id(enumerator.current()));
entityName = SysLabel::labelId2String2(dataEntity.labelDefined(), #EnLanguageId);
if (dataEntity.dataManagementEnabled())
{
elabels.clear();
elabels.TableName = enumerator.current();
elabels.EntityName = entityName;
elabels.insert();
}
}
}
}
#D365F&O #DataEntities #MSDyn365F&O
Tuesday, January 14, 2020
Power BI - How to embed a PBIX using Form in D365FO and add in a workspace.
We have an option in D365 to embed PowerBI visuals and run through workspaces. Here I am providing steps to do the same.
1. Create a PowerBI report using power BI desktop and save the file, .pbix file will be saved. You can refer below youTube tutorial
2. Open Visual Studio in your dev box and Right click on your project - Add - New Item

3. Create a new 'Resource' and give the name of that resource.

4. As soon as you hit the ok, VS will popup the file explorer to select the 'PBIX' file, select the pbix you have developed\created.

5. Hit 'ok', resource will get created in your project.

6. Create a Display Menu Item 'GLInsightsPBIXDisplay' and and create a form with tab and tab pages (can be per report) and a group control and then add below code.. Update the tab, tabpage , menu item and pbix names.
[Form]
public class GLInsightsWorkspace extends FormRun
{
PowerBIReportSetupHelper helperGL;
boolean isPowerBIReportGL;
///
<summary>
///
///
</summary>
private void initPowerBI()
{
if (isConfigurationkeyEnabled(configurationKeyNum(PowerBIEmbedded_App)))
{
helperGL = PowerBIReportSetupHelper::construct();
helperGL.parmGroupControl(GLInsightsPBIX);
if (hasMenuItemAccess(menuItemDisplayStr(GLInsightsPBIXDisplay), MenuItemType::Display))
{
helperGL.parmIsCrossCompany(true);
GLInsightsPBIX.caption("GL Insights");
helperGL.parmResourceName(resourceStr(demoAddPowerBIResource));
}
}
}
///
<summary>
///
///
</summary>
public void init()
{
super();
this.initPowerBI();
GLInsights.pageActivated();
}
[Control("TabPage")]
class GLInsights
{
///
<summary>
///
///
</summary>
public void pageActivated()
{
super();
if (!isPowerBIReportGL)
{
isPowerBIReportGL = true;
helperGL.run();
}
}
}
}
8. Add this form in your menu item as an object.
9. Now create a new 'Tile' Right click on your project -> Add -> new Items -> User Interface - Tile.
10 . Once created, select your display menu item in tile properties. And give the label.

11. Add this tile to your menu.

12 - Once you click on this workspace, your pbix will get called.
Tags: #PowerBI #D365FO #Pbix #Dynamics
Tuesday, August 13, 2019
How to add an Entity in Data Project through code (X++)
DMFDefinitionGroupEntity addEntity;
if (DMFQuickImportExportFormHelper::validateEntity(_entityName, _sourceName, DMFOperationType::Export))
{
ttsbegin;
addEntity.clear();
addEntity.initValue();
addEntity.DefaultRefreshType = DMFRefreshType::IncrementalPush;
addEntity.DefinitionGroup = _definitionGroup;
addEntity.Entity = _entityName;
addEntity.EntityXMLName = _targetEntity;
addEntity.SkipStaging = NoYes::Yes;
addEntity.source = _sourceName;
addEntity.validationStatus = NoYesError::Yes;
addEntity.ExecutionUnit = NoYes::Yes;
addEntity.LevelInExecutionUnit = NoYes::Yes;
addEntity.insert();
//Generate mapping
DMFXmlGeneration::generateMappingV2(addEntity);
ttscommit;
}
Variables -
if (DMFQuickImportExportFormHelper::validateEntity(_entityName, _sourceName, DMFOperationType::Export))
{
ttsbegin;
addEntity.clear();
addEntity.initValue();
addEntity.DefaultRefreshType = DMFRefreshType::IncrementalPush;
addEntity.DefinitionGroup = _definitionGroup;
addEntity.Entity = _entityName;
addEntity.EntityXMLName = _targetEntity;
addEntity.SkipStaging = NoYes::Yes;
addEntity.source = _sourceName;
addEntity.validationStatus = NoYesError::Yes;
addEntity.ExecutionUnit = NoYes::Yes;
addEntity.LevelInExecutionUnit = NoYes::Yes;
addEntity.insert();
//Generate mapping
DMFXmlGeneration::generateMappingV2(addEntity);
ttscommit;
}
Variables -
- _entityName - Name of the Entity
- _SourceName - Source Data Format (like BYOD, Excel)
- _definitionGroup - Definition Group Name (or Data Project Name)
#DataEntities #X++ #D365F&O #DMF
Thursday, June 27, 2019
How to get Azure Blob URL in D365FO
When we are exporting data in Excel or any other format using DIXF, file gets uploaded in Azure Blob and if you need that azure blob URL you can get using below code -
DMFEntityExportDetails exportDetails;
you can find exportDetails table buffer by passing DMF definition group and entity name.
str downloadUrl = DMFDataPopulation::getAzureBlobReadUrl(str2Guid(exportDetails.SampleFilePath));
#D365F&O #DIXF #DMF
Thursday, April 4, 2019
How to get the primary table from Data Entity in D365F&O
Overview - How to get the primary table from an entity in D365F&O
public static TableName getPrimaryTable(TableName _tableName)
{
TableName tableName;
Query q;
QueryBuildDataSource dataSource;
DictDataEntity dictEntity = new DictDataEntity(tableName2Id(_tableName));
if (dictEntity)
{
q = dictEntity.query();
if (q.dataSourceCount() >= 1)
{
dataSource = q.dataSourceNo(1);
if (dataSource)
{
tableName = tableId2Name(dataSource.table());
}
}
}
return tableName;
}
And if we need all tables from the data entity, we can loop the data source count.
#D365F&O #AX #Entities
public static TableName getPrimaryTable(TableName _tableName)
{
TableName tableName;
Query q;
QueryBuildDataSource dataSource;
DictDataEntity dictEntity = new DictDataEntity(tableName2Id(_tableName));
if (dictEntity)
{
q = dictEntity.query();
if (q.dataSourceCount() >= 1)
{
dataSource = q.dataSourceNo(1);
if (dataSource)
{
tableName = tableId2Name(dataSource.table());
}
}
}
return tableName;
}
And if we need all tables from the data entity, we can loop the data source count.
#D365F&O #AX #Entities
Friday, July 27, 2018
Metadata Lookup - list of forms in D365
Here I am explaining how to write a lookup to get a list of forms and same way we can write a lookup of any metadata lookups.
In AX 2012 we have a table called 'UtilElements' to get the list of objects and then you can filter with 'UtilElementType' in your query.
In 365, they have introduced an API instead to get the list of metaData based on your requirements.
In AX 2012 we have a table called 'UtilElements' to get the list of objects and then you can filter with 'UtilElementType' in your query.
In 365, they have introduced an API instead to get the list of metaData based on your requirements.
var forms = Microsoft.Dynamics.Ax.Xpp.MetadataSupport::FormNames();
So for lookup, I have developed a tmp table and that has two columns
1. FormName
2. FormLabel
And that table will get inserted when you open the form where we have a requirement to put the lookup.
*******************************************************
SysFormsListTmp formsList;
public void populateFormsListTmp() // custom method to populate the tmp table
{
var forms = Microsoft.Dynamics.Ax.Xpp.MetadataSupport::FormNames();
ttsbegin;
while (forms.MoveNext())
{
formsList.clear();
formsList.FormName = forms.Current;
formsList.FormLabel = formName2Pname(formsList.FormName);
formsList.insert();
}
ttscommit;
}
public void init() //init() method of the form.
{
super();
element.populateFormsListTmp();
}
******************************************************
And then you can write a lookup() method on your control.
******************************************************
public void lookup(FormControl _formControl, str _filterStr)
{
SysTableLookup sysTableLookup = SysTableLookup::newParameters(Tablenum(SysListOfFormsTmp),_formControl);
Query query = new Query();
QueryBuildDataSource queryBuildDataSource;
sysTableLookup.addLookupField(fieldNum(SysFormsListTmp, FormName));
sysTableLookup.addLookupfield(fieldNum(SysFormsListTmp, FormLabel));
queryBuildDataSource = query.addDataSource(tableNum(SysFormsListTmp));
queryBuildDataSource.addSortField(fieldNum(SysFormsListTmp, FormName), SortOrder::Ascending);
sysTableLookup.parmQuery(query);
sysTableLookup.parmTmpBuffer(formsList);
sysTableLookup.performFormLookup();
super(_formControl, _filterStr);
}
Tags: #FormLookup #MetaData #D365FO
Saturday, July 21, 2018
Power BI - How to embed a PBIX in D365FO and add in a workspace.
We have an option in D365 to embed PowerBI visuals and run through workspaces. Here I am providing steps to do the same.
1. Create a PowerBI report using power BI desktop and save the file, .pbix file will be saved. You can refer below youTube tutorial


1. Create a PowerBI report using power BI desktop and save the file, .pbix file will be saved. You can refer below youTube tutorial
2. Open Visual Studio in your dev box and Right click on your project - Add - New Item
3. Create a new 'Resource' and give the name of that resource.
4. As soon as you hit the ok, VS will popup the file explorer to select the 'PBIX' file, select the pbix you have developed\created.
5. Hit 'ok', resource will get created in your project.
6. Create a Display Menu Item 'demoAddPowerBiDisplay' and also create a controller class 'demoAddPowerBIWorkSpaceController' and extends with 'PBIReportControllerBase'

Note - You can copy the standard controller class like - 'FinancialInsightsWorkspaceEmbeddedController'
7. Now add or modify the 'Main' method of the class and call your pbix resource -

8. Add this controller class in your menu item as an object.
9. Now create a new 'Tile' Right click on your project -> Add -> new Items -> User Interface - Tile.
10 . Once created, select your display menu item in tile properties. And give the label.
11. Add this tile to your menu.
12 - Once you click on this workspace, your pbix will get called.
Tags: #PowerBI #D365FO #Pbix #Dynamics
Monday, June 11, 2018
Data Entities - Custom Query Change Tracking in D365FO
Requirement is to enable the change tracking on table which is not part of the entity at all. But that table is being used in postLoad() to populate the values in an entity.
Let’s take an example of WMSLocation entity, we have added a custom column in that table and poplulating that column in postLoad method of the entity from some other table (demoLocationType). Now the scenario is when we are updating or adding data in this custom table then system should push or update data in wmsLocation entity.
If we are enabling primary or All table change tracking on entity, system won't update the WMSLocation when we are updating or adding column in table 'demoLocationType'.
Solution - We should write a custom method and name that 'defaultCTQuery' and in that method we would have create a query based on the relation between above two tables WMSLocation and demoLocationType and return the query object.
public static Query defaultCTQuery()
{
Query q;
q = new Query();
QueryBuildDataSource qbd = q.addDataSource(tablename2id('WMSLocation'));
qbd = qbd.addDataSource(tablename2id('demoLocationType'));
qbd.relations(false);
qbd.addLink(fieldName2Id(tableName2Id('WMSLocation'),'wMSLocationId'),fieldName2Id(tableName2Id('demoLocationType'),'wMSLocationId'));
return q;
}
And then go to Data Entities -> Filter the entity (WMSLocation) -> Change Tracking -> Enable Custom query.

Tags- #DataEntities, #ChangeTracking, #MSDYN365FO
If we are enabling primary or All table change tracking on entity, system won't update the WMSLocation when we are updating or adding column in table 'demoLocationType'.
Solution - We should write a custom method and name that 'defaultCTQuery' and in that method we would have create a query based on the relation between above two tables WMSLocation and demoLocationType and return the query object.
public static Query defaultCTQuery()
{
Query q;
q = new Query();
QueryBuildDataSource qbd = q.addDataSource(tablename2id('WMSLocation'));
qbd = qbd.addDataSource(tablename2id('demoLocationType'));
qbd.relations(false);
qbd.addLink(fieldName2Id(tableName2Id('WMSLocation'),'wMSLocationId'),fieldName2Id(tableName2Id('demoLocationType'),'wMSLocationId'));
return q;
}
And then go to Data Entities -> Filter the entity (WMSLocation) -> Change Tracking -> Enable Custom query.

Tags- #DataEntities, #ChangeTracking, #MSDYN365FO
Tuesday, May 1, 2018
How to write a display method in extensions (D365)
Requirement is to display a column from InventTable on Movement Journal lines form based on the selected item.
1. Create a new class and give a name, best practice is to give a name of the object with extension keyword


2. Once class is created, make sure you are using proper syntax and namespaces as below and also write the display method based on your requirement -

3. Compile the class.
4. Now find the 'InventJournalMovement' form in AOT and create an Extension

5. Then open the form and create a column as per your requirement.


6 . After create a new column, right on the column and select properties and then select the data source and data method which we have created in a final class.

7 . Build the solution. Now we should be able to see that column in Movement journal lines form

Tags: #DisplayMethods , #Extensions, #X++, #D365FO
1. Create a new class and give a name, best practice is to give a name of the object with extension keyword


2. Once class is created, make sure you are using proper syntax and namespaces as below and also write the display method based on your requirement -

4. Now find the 'InventJournalMovement' form in AOT and create an Extension
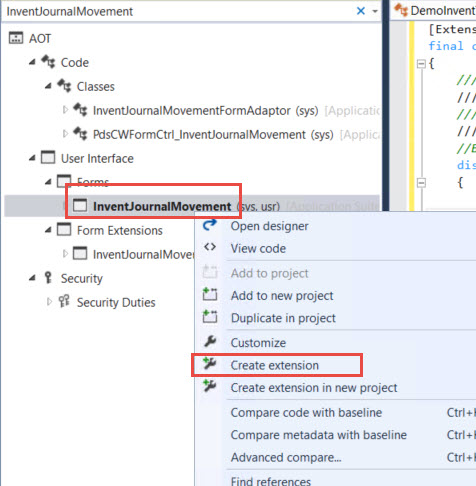


Tags: #DisplayMethods , #Extensions, #X++, #D365FO
Wednesday, April 25, 2018
How to override a clicked method of a button in a form Extension D365
Requirement is to add a button on CustInvoiceJour form and override the clicked method, so I would be creating an extension of that form and will add button there.
1. Create extension of 'CustInvoiceJour' form

2. Open extension of that form from the solution explorer and add a button

3. We have added a button, now we have to perform some operations on click of that button. And for that we need to write the 'OnClicked' event. In order to do that, expand the 'Event's under that control and right click on 'onClicked' event and select 'Copy Event Handler Method'
 4. 'OnClicked' event handler is copied and now you can paste as a method in any of your custom class or you can create a new class. I am using one of my custom classes.
 5. Now the question is, how we will get the selected record on that form or how would we get the form data source, if you take a look of this above method, you will seen we have a formContol as a parameter and by using that we can get the form data source and selected records.

After getting the table buffer and form data source, we can perform other operations.
Tags : X++ , D365, Form extensions, Events, OnClicked
1. Create extension of 'CustInvoiceJour' form

2. Open extension of that form from the solution explorer and add a button


After getting the table buffer and form data source, we can perform other operations.
Tags : X++ , D365, Form extensions, Events, OnClicked
Wednesday, April 18, 2018
Add controls run time and override the method in D356 (X++)
Here I will be explaining, how to create buttons run time and override the clicked method.
We would be creating buttons run time based on the setup companies in some custom table, Like I have table called 'DemoCompanyList' and that table has 3 companies setup
1. USMF
2. USMG
3. IND
Lets create a form and give a name 'DemoRunTimeControl' and then we can apply the pattern based on our requirement and then add Action Pane - Button Group - Menu Button(control name - ButtonHeaderInquiry), change the AutoDeclaration property to 'Yes' for this control.
init() - To get the list of companies and call method addRunTimeButtons()
addRunTimeButton() - In this method we will add buttons to menu button and also register the clicked method so that when we click on those buttons, it should the written clicked method.
RunTimeButton_clicked() - In this method we will opening the custInvoiceJour menu item based on the clicked button.
[Form]
public class DemoRunTimeControl extends FormRun
{
Map buttonCompany;
public void init()
{
container companies;
counter i;
super();
buttonCompany = new Map(Types::Integer, Types::String);
companies = DemoCompanyList::findCompanyList(); // Find company list will return the list of the companies
for (i = 1; i <= conLen(companies); i++)
{
element.addRunTimeButton(conPeek(companies, i)); //addRunTimeButtons will add buttons based on the company setup
}
}
private void addRunTimeButtons(DataAreaId _dataAreaId = #emptyString)
{
FormButtonControl runTimeControl;
#define.runTimeCtrl ('DemoRunTimeButton')
runTimeControl = ButtonHeaderInquiry.addControl(FormControlType::Button, #runTimeCtrl + _dataAreaId);
//Invoice (%1)
runTimeControl.text(strfmt("Customer Invoice (%1)", _dataAreaId));
runTimeControl.registerOverrideMethod(methodStr(FormButtonControl, clicked), formMethodStr(DemoRunTimeControl, 'RunTimeButton_clicked'), element);
buttonCompany.insert(runTimeControl.id(), _dataAreaId);
}
public void RunTimeButton_clicked(FormButtonControl _formButtonControl)
{
//Set the local control to the actual control that is calling the method.
_formButtonControl = this.controlCallingMethod();
CompanyId company;
company = buttonCompany.lookup(_formButtonControl.id());
if (company)
{
changecompany (company)
{
//Open invoice journal in specific company
new MenuFunction(MenuItemDisplayStr(CustInvoiceJour),MenuItemType::Display).run();
}
}
}
}

When you will click on first button, system will open customer invoice journals form in USMF company and the same way if you click on IND one, system will open journals from IND company.
We would be creating buttons run time based on the setup companies in some custom table, Like I have table called 'DemoCompanyList' and that table has 3 companies setup
1. USMF
2. USMG
3. IND
Lets create a form and give a name 'DemoRunTimeControl' and then we can apply the pattern based on our requirement and then add Action Pane - Button Group - Menu Button(control name - ButtonHeaderInquiry), change the AutoDeclaration property to 'Yes' for this control.
Form Methods -
init() - To get the list of companies and call method addRunTimeButtons()
addRunTimeButton() - In this method we will add buttons to menu button and also register the clicked method so that when we click on those buttons, it should the written clicked method.
RunTimeButton_clicked() - In this method we will opening the custInvoiceJour menu item based on the clicked button.
[Form]
public class DemoRunTimeControl extends FormRun
{
Map buttonCompany;
public void init()
{
container companies;
counter i;
super();
buttonCompany = new Map(Types::Integer, Types::String);
companies = DemoCompanyList::findCompanyList(); // Find company list will return the list of the companies
for (i = 1; i <= conLen(companies); i++)
{
element.addRunTimeButton(conPeek(companies, i)); //addRunTimeButtons will add buttons based on the company setup
}
}
private void addRunTimeButtons(DataAreaId _dataAreaId = #emptyString)
{
FormButtonControl runTimeControl;
#define.runTimeCtrl ('DemoRunTimeButton')
runTimeControl = ButtonHeaderInquiry.addControl(FormControlType::Button, #runTimeCtrl + _dataAreaId);
//Invoice (%1)
runTimeControl.text(strfmt("Customer Invoice (%1)", _dataAreaId));
runTimeControl.registerOverrideMethod(methodStr(FormButtonControl, clicked), formMethodStr(DemoRunTimeControl, 'RunTimeButton_clicked'), element);
buttonCompany.insert(runTimeControl.id(), _dataAreaId);
}
public void RunTimeButton_clicked(FormButtonControl _formButtonControl)
{
//Set the local control to the actual control that is calling the method.
_formButtonControl = this.controlCallingMethod();
CompanyId company;
company = buttonCompany.lookup(_formButtonControl.id());
if (company)
{
changecompany (company)
{
//Open invoice journal in specific company
new MenuFunction(MenuItemDisplayStr(CustInvoiceJour),MenuItemType::Display).run();
}
}
}
}

Thursday, September 21, 2017
Microsoft Flows - How to create a very simple flow
Automate tasks by integrating your favorite apps with Microsoft Flow. Make repetitive tasks easy with workflow automation.
Here are steps to create a flow-
1. Open a web browser and open URL https://us.flow.microsoft.com/en-us/

2. Click on 'My flows' and then hit '+ click from blank'

3. It will open a page as below and then we should select a trigger, I have selected 'When a new mail arrives' for this demo


5. Then go for next step, you will get two options

6. We have multiple actions to select, I have selected 'Notifications' for this demo

7. You will get two options

8. We need to select content for notifications. And also I have selected criteria 'FROM' 'ajitax@outlook.com', that means I'll be notified if I get an email from this email address only.
After selecting values, hit 'create flow' and done.

9. You can see that flow under 'My Flows' and also can review run history. I already sent an email from my 'ajitax@outlook.com' email id to my work id which is associated with Microsoft Flow.

10. As soon as I received email from this particular email id (ajitax@outlook.com), flow notification showed up in my mobile.

Here are steps to create a flow-
1. Open a web browser and open URL https://us.flow.microsoft.com/en-us/

2. Click on 'My flows' and then hit '+ click from blank'

3. It will open a page as below and then we should select a trigger, I have selected 'When a new mail arrives' for this demo

4. Give the name of your flow and also we can put multiple criteria(s)

- Add an action
- Add a condition
I have selected 'Add an action'

6. We have multiple actions to select, I have selected 'Notifications' for this demo

7. You will get two options
- Send me a mobile notifications (Mobile App required)
- Send me a email notifications
I have a selected 'send me a mobile notifications'

After selecting values, hit 'create flow' and done.

9. You can see that flow under 'My Flows' and also can review run history. I already sent an email from my 'ajitax@outlook.com' email id to my work id which is associated with Microsoft Flow.

10. As soon as I received email from this particular email id (ajitax@outlook.com), flow notification showed up in my mobile.

Vendor Invoice processes at one place in D365
Vendor Invoice Entry
Dynamics 365 has one place for all your vendor invoices related need -

Here you can create new invoices\invoice journals and also can view all non-invoiced Purchase orders here.

And even we can create and view global invoice journals

Wednesday, September 20, 2017
TF400813: Resource not available for anonymous access. Client authentication required.
I was trying setting up TFS online (VSO) from my AX 2012 R3 instance

And got this below error -

I am using VS 2013 and Team Explorer 2010
Resolution -
Install Visual Studio 2010 SP1 Team Foundation Server Compatibility GDR from
Restart AOS and try. If that doesn't work, try after restarting Dev itself.
Monday, September 18, 2017
How to write a job (Runnable class) in Dynamics 365
Steps to create a Job\Runnable class in D365
Step 1 - Open a new project in Visual Studio -

Step 2 - Select the 'Dynamics 365' as a template and enter the name of the project -

Step 3 - Solution Explorer would be open with your new project

Step 4 - Right click on your project and select Add-> New Item

Step 5 - Select the 'Runnable class(Job)' from the list -

Step 6 - As soon as you select 'Runnable class(job)', it will open below window -

Step 7 - Just added info to print the 'Hello World' :)

Step 8 - Save the changes and right click on your project and click on 'Set as Startup Project'

Step 9 - Now start your project by clicking start button as shown below -

Step 10 - Once you start, it will open the browser with your result.

Subscribe to:
Posts (Atom)